Enemies Abound 5 of 5 is found here.
The original walkthrough is made of MrBadidea and is found here.
Updates by: Jarez Aleris, lyfan, Arryn Sun, Aceformat (screenshot), Szmuglerka, Kynes Harkonnen, Ciel Chocobo
Last update: 2008.02.12
Faction: Gallente
Damage dealt: Therm/Kin
Reccomended damage: Therm/Kin
Drone Aggro: Yes.
Completed in T2 fit Abaddon, w/ T1 drones (DR: Easy/Med) (Moriari)
Completed in Nighthawk (Aceformat)
Completed with t2 fitted Raven (except siege launchers & drones) (DR:Easy) (Szmuglerka)
Completed in: Drake (Passive, T2 fitted, with shield recharge rigs) DR: Difficult, 1 warp out (ZhouXi)
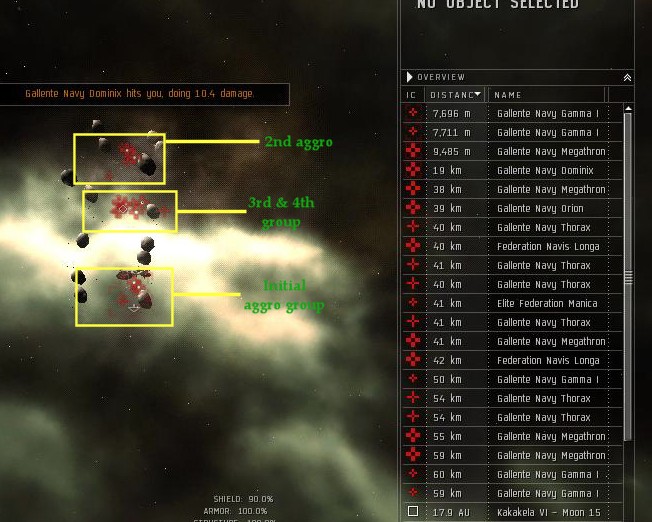
Single pocket:
GROUP 1 - (Inital aggro)
1x Gallente Navy Dominix
1x Gallente Navy Megathron
2x Gallente Navy Gamma I Support Frigate - (I kept them alive until I took out GROUP 2)
GROUP 2
1x elite federation manica (Scramble)
4x navy thorax
2x navy mega
1x navy orian
1x federation navis longa
1x federation praktor navis praetoria (sensor damps??) (Web/scramble)
GROUP 3
2x Gallente Navy Megathron
2x Gallente Navy Thorax
3x Gallente Navy Gamma I Support Frigate
Different approach:
Initial warpin will grab you aggro off the first set of NPC's, kill these off first, do not move when you drop out of warp. The second group will aggro the closer you get to the can, so start approaching the can and then stop once this group aggros you.
Third and fourth aggros come from that center group, again once you have killed the second group move closer to the can until you pick up aggro off 2 BS's
and a couple of frigs/cruisers. then once done, finish off the rest
Enemies Abound 2/5
Courier Mission
Cargo = 0.1M3
Usually a 2~3 jump afair, go here and grab this, bring it back pleasethanks from yer agent.
If you've got this far, you should be able to manage it!
Mission Reward: 268,000 ISK
Mission Bonus Reward: 91 Units of Enriched Uranium
Completed with t2 fitted Raven (except siege launchers & drones) (DR:Easy) (Szmuglerka)
Completed in: Drake (Passive, T2 fitted, with shield recharge rigs) DR: Easy to Moderate (ZhouXi)
WARP IN - (auto aggro from 7 frigates)
5x Gallente Navy Officer
2x Gallente Navy Delta I Support Frigate
GATE 1 - (auto aggro from 1x BS, 4x cruisers and 5 frigates)
1x Federation Covinus
4x Federation Praktor Centurion
2x Federation Praktor Harpago
2x Federation Praktor Belos
1x Elite Federation Lixa - (trigger for respawn if attacked)
*1st RESPAWN - (auto aggro from 2x BS, 3x BC, 3x destroyer, 1x frigate)
1x Federation Navis Longa
1x Federation Covinus
1x Federation Praeco
2x Federation Pezos
1x Federation Matara
2x Federation Machaira
1x Elite Federation Lixa - (trigger for respawn if attacked)
*2nd RESPAWN - (auto aggro from 3x BS, 2x BC, 2x destroyer, 1x frigate)
1x Federation Navis Longa
2x Federation Covinus
1x Federation Praeco
1x Federation Calo
2x Federation Matara
1x Elite Federation Lochos - (trigger for respawn if attacked)
*3rd RESPAWN - (auto aggro from 2x BS, 2x elite cruiser, 2x destroyer, 1x frigate)
1x Federation Navis Longa
1x Federation Covinus
1x Elite Federation Bearcus
1x Elite Federation Calo
2x Federation Arcus
1x Elite Federation Lixa
GATE 2 - (3 groups, auto aggro from one, no linked aggro between groups)
7x Gallente Navy Megathron
3x Gallente Navy Orion
3x Federation Navy Orion's Wingman
Enemies Abound 4/5 - Gallente Navy Version
Update by: Arryn Sun (2007.07.12)
Completed in: Drake (Passive, T2 fitted, with shield recharge rigs) DR: Easy (ZhouXi)
Deadspace (Gates) - Area's = 3
Please note: The design of this deadspace, as in the individual stages are precisely the same as Enemies Abound 3/5, but with an extra stage tacked on at the end. The rats differ in each stage as well, so don't just rush in and assume everything will work the same.
** Area 1 **
Rats
2 Navy Orion
5 Gallente Navy Delta II Support Frigate
3 Gallente Navy Officer
This group will aggro on entry, although I believe the Delta II support frigs will not warp scramble. The orions don't seem to do *too* much damage either, so you should be good here solo quite easily.
** Area 2 **
Rats
3 Gallente Navy Dominix
5 Gallente Navy Megathron
Two of the mega's are right ontop of the warp in point, and will aggro upon somebody entering. They again don't do too much damage in such a small group so you should be fine again. Once those are out of the way, the remaining ships are split into two groups again. 2 Navy Domi's and a Navy Mega off to the right, and two navy mega's and a domi on the left. Neither group seems connected, so take them out in whatever order you wish.
** Area 3 **
Rats
3 Roden Shipyard Megathron
4 Roden Shipyard Officer
7 Roden Shipyard Interceptor (Note: Even though there are 7 "Interceptors" sharing the same name, there are TWO different versions - two that initally
attack you appear to be the same as the Gamma II/I frigs from the 1/5, but the 5 that lie in wait appear to be the same as the Delta IIs from the first
stage of the mission)
1 Roden Shipyard Orion
3 Gallente Sentry Guns (III) (70K Bounty)
When you enter this stage, you will immedately aggro the 4 Roden Patrol Officers, 2 of the Interceptors, the Sentries and the Orion.
Take out the Orion first, leave the sentries alone as attacking them may draw aggro from everything else. Take out the Interceptors next since they web. From the beginning I was moving away from the structure to give me some room. After the Interceptors take out the 4 officers which do very little damage anyway, but they do shoot lots of defenders.
After this you are left with the Megathrons and remaining Interceptors (which will web, but I never came close to having to warp out).
The bottom line is that the Megathrons and last 5 Interceptors did not aggro until I attacked them. Attacking the sentries earlier may aggro them as well as attacking anything other than the Orion at the beginning.
Structure dropped 1,000 Planetary Vehicles (plus several other goodies) for me and most of the bunkers in Area 2 dropped loot (not just ammo).
The station itself will soak up around 150K HP of damage. (228 torps, 676.8 damage each, ish).
Mission Reward: 1,450,000 ISK
Mission Bonus Reward: 1,210,000 ISK