
Reported by: Khana Loaris, 2007.08.20
Additions by: The JediDK, Princesse Qiao, Elseer Radak, Maria Epinconthe, Cyppe, Ixtelle, Reep Mawr, Kazuki Katsuro, Bellasarius Baxter, Somal Thunder,
Kismeteer.
Last updated: 2008.03.11
Note 1: Under the group listings in this report 'ship/ship' indicates that NPC ship names may vary but the number of ships of that class eg. (Cruiser) is the same - ie. '2 Corpior Bishop/Seer (Battlecruiser)' indicates that there are 2 Battlecruisers but they may be named either Bishop OR Seer since the names are random).
Note 2: Some parts have different rats (So far part 7, 8 and 10). You might encounter Blood Raiders, Gurista Pirates or Sansha Nation.
Faction: Pirate
Mission type: Deadspace
Damage dealt: EM/Thermal
Recommended damage dealing: EM/Thermal
Completed in: Arbitrator (T1 with 1x Reflective, 2xThermic membranes - T1 med drones) DR: Easy
Single stage
Group 1 @10km - instant aggro
2 tower sentry II
2 Rogue Pirates (Cruiser)
Group 2 @60km
4 Rogue Pirate (Cruiser)
1 Rogue Pirate raider (Cruiser) drops cargo cannister holding the prisoners needed for mission completion.
Rogue Pirates deal heavy EM missile damage - no web or scramble.
No structures have loot.
Mission type: Courier
1 unit of prisoners (1.0 m3)
Faction: Mercenary
Mission type: Deadspace
Damage dealt: Kinetic/Thermal/Explosive
Recommended damage dealing: EM/Thermal
Completed in: Arbitrator (T1 with 1x Thermic, 2xMagnetic membranes - T1 med drones) DR: Easy/Medium
Stage 1
Three groups at initial warp in, no aggro. All groups aggro independently.
Group 1 (right) @ 25-35k
4 Mercenary fighters (Frigate)
3 Mercenary corporals (Cruiser)
Group 2 (left) @ 40-45k
4 Mercenary elite fighters (Frigate)
2 Mercenary commanders (Cruiser)
Group 3 (middle) @ 45-50k
2 Mercenary wingman (Frigate) (web)
1 Mercenary lieutenant (Cruiser)
1 Drazin Jaruk (web)
Habitat holds 3x Drazin Keycard - needed to activate gate to second stage.
The Stage holds 11 Omber roids with 15k in each totalling 165k Omber.
As they are behind the acc gate they take a bit more time to do than normally.
The omber is worth more than the mission bonus. But you can(or i did) make in time to get the bonus reward as well. (using 2 hulks)
Stage 2
This stage varied quite a bit on the 2 occasions I tried. The Zerak Cheryn version is at 10-20k on warp in & in his Gallente cruiser can be extremely harsh
at close range and would be best taken out first if you can tank the two webbing frigates.
The Kuran 'Scarface' Lonan version (Caldari based) is at 40-50k on warp in & and is easy to tank.
Group 1 @ 20-40k
2 Mercenary wingman (Frigate) (web)
1 Mercenary lieutenant (Cruiser)
1 Zerak Cheryn (Cruiser) (Ewar invulnerable) or 1 Kuran 'Scarface' Lonan (Cruiser) or Lynk (web) or 'Korrani Salemo', flying a Moa-type cruiser (webs)
Get prisoners from dropped cargo container.
Structures that drop loot:
Storage Facility - miscel trade goods
Mission type: Courier
1 unit of data chip (0.1m3)
Faction: Darkonnen (Blood Raiders)
Mission type: Deadspace
Damage dealt: EM/Thermal
Recommended damage dealing: EM/Thermal
Completed in: Arbitrator (T1 with 1x Reflective, 2xThermic membranes - T1 med drones) DR: Easy
Single Stage
Group 1 @30k - aggro after 10-15secs (destroying this group completes the mission)
3 Darkonnen Veteran (Frigate)
2 Darkonnen Gang Leader (Cruiser)
Group 2 @80k
3 Darkonnen Veteran (Frigate)
3 Darkonnen Gang Leader/Overlord (Cruiser)
Structures that drop loot:
silo - ammo types
habitation modules - miscel trade goods
Faction: Komni
Damage dealt: Therm/Kin
Reccomended damage dealing: Therm/Kin
1 Komni Assassin (Caracal)
2 Komni Honcho (Moa)
5 Komni Smuggler (Merlin)
No structures contain loot.
Faction: Maru
Damage dealt: EM/Therm
Recommended damage dealing: Thermal, then EM
Completed in: Drake, passive tanked (2 SE II's) DR: Easy (Kismeteer)
Single Stage
Aggro immediately at 5 to 7km, 2 cruisers and 8 frigs
1x maru Harbinger 75k
1x Maru Raid Leader 40k
8x Maru Raider 15k
No structures drop loot.
The ship named "Harbinger" might drop a +3 Implant.
Mission type: Courier
110 unit of Antiviral Drugs (22 m3)
Faction: Blood Raiders
Mission type: Deadspace
Damage dealt: EM/Thermal
Recommended damage dealing: EM/Thermal
Completed in: Arbitrator (T1 with 1x Reflective, 2xThermic membranes - T1 med drones) DR: Easy
Stage 1
Warp in first gate, no aggro.
Group 1 @60-65km
2 Darkonnen Overlord (Cruiser)
1 Darkonnen Envoy (Battleship)
As the agent directive was only to talk, did not engage and went through warp gate.
Stage 2
4 groups at warp in, no instant aggro.
Attack in any order - all groups aggro'd independently.
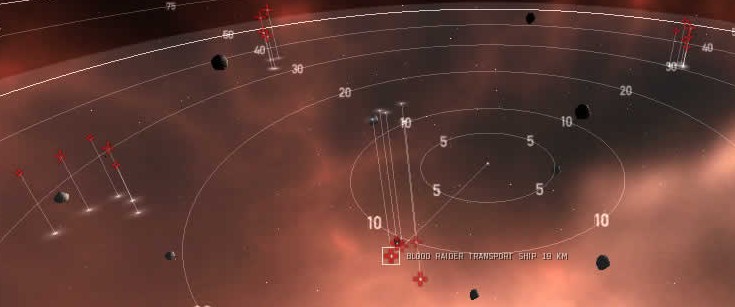
Group 1 (middle bottom) @10-20km
3 Blood raider transports
2 Corpior Bishop/Seer (Battlecruiser)
Group 2 (right) @30-40km
5 Corpii Reaver/Engraver (Frigate)
1 Corpii Fanatic/Shade (Battlecruiser)
Group 3 (left) @20-30km
3 Corpii Reaver/Engraver (Frigate)
2 Corpior Shade/Seer (Battlecruiser)
Group 4 (middle top) @30-40km
4 Corpum Arch Templar/Revenant (Cruiser)
Blitz: Destroy middle bottom group (transports) drops cargo container containing 5 prisoners. Mission Completes.
Also possible to go back and destroy the Darkonnens in Stage 1:
2 Darkonnen Overlord (Cruiser)
1 Darkonnen Envoy (Battleship) (Ewar invlunerable - fires Cruise Missiles to 75km+ range)
No re-inforcements. No impact on mission when handed in.
Damage to tank: Kin/therm
Damage to deal: Kin/therm
Stage 1.
Only one BS greets you:
250k Envoy (Rattlesnake). Does not trigger anything. Also EW invulnerable. Might drop an implant.
Stage 2.
3 Groups, all about 40-50k away:
Group 1
7 Frigs, 4 Cruisers, 2 BC.
Only need to kill of the group above to complete
Groups 2 and 3:
2 BC,
4 light cruisers
No auto aggro at any point in this mission. The light cruisers do not aggro the 2 BC either, so you can do them separately if you want.
Dmg Dealt: EM / Therm
Reccommended Dealing: EM / Therm
Completed with general-purpose T2 fit Nighthawk, Kin missiles. DR: Easy (Ixtelle)
Pocket 1:
Only 1 BS (Maru Envoy), flies a Nightmare (250k)
No aggro.
Pocket 2:
No aggro until you fire on them, groups aggro one at a time.
Numbered left to right from WIP
Group 1:
2x BC, 4x Frig
Group 2:
1x BC, 5x Frig
Group 3:
2x Cruiser, 3x Frig
Group 4:
3x Cruiser

Faction: Blood Raiders
Mission type: Deadspace
Damage dealt: EM/Thermal
Recommended damage dealing: EM/Thermal
Completed in: Arbitrator (T1 with 1x Reflective, 2xThermic membranes - T1 med drones) DR: Easy
Single Stage
Group 1 @ 25-30k
5 Corpii Engraver (Frigate)
3 Corpior Shade (Battlecruiser)
Structures that drop loot:
Storage Facility - miscel trade goods
Damage Dealt: EM/Therm
Reccomended Damage Dealing: EM/Therm
Completed with: T2 General-Purpose Fit Nighthawk DR: Easy. (Ixtelle)
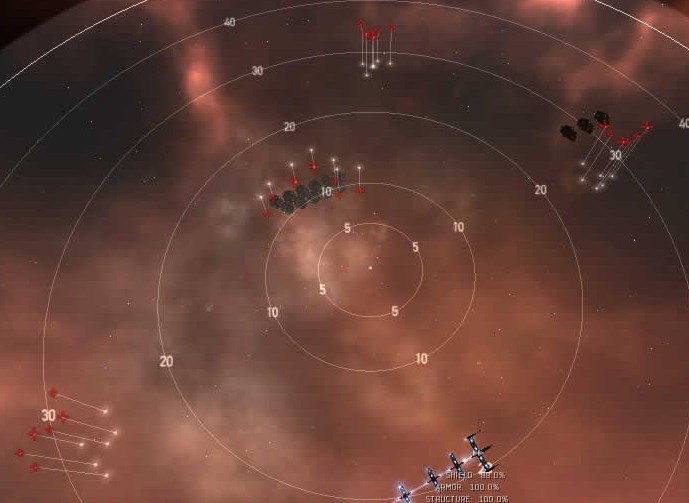
No aggro on warp in. 3 groups, numbered left to right
Group 1:
2x Cruiser, 4x Frig
Group 2:
1x BC, 4x Frig (Webs, Possible Scrams)
Group 3:
2x Cruiser, 5x Frig
Groups aggro one at a time if you shoot at them one at a time.
Faction: Sancha's Nation
Mission type: Deadspace
Damage dealt: EM/Therm
Extras: Sancha's Demon/Berserker (Drone, Scram, Web)
Recommended damage dealing: EM/Therm
Completed in: Drake (1x Em, 1xkin) DR: Easy (Kazuki Katsuro)
Single Stage
Warp in, 4 groups. All groups aggro independently.
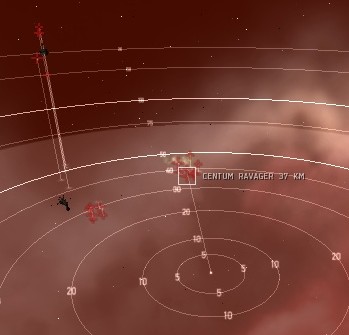
Group 1 @20-25km - instant aggro
3 Centum Execrator (Cruiser)
Group 2 @30-40km
3 Centii Butcher (Frigate)
2 Centii Manslayer (Frigate)
1 Centatis Specter(Battlecruiser)
Group 3 @45km
1 Sancha's Berserker (Drone, Scram, Web)
2 Sancha's Demon (Drone, Scram, Web)
1 Centatis Specter (Battlecruiser)
Group 4 @60-65km
2 Centatis Phantasm (Battlecruiser)
2 Centior Cannibal (Destroyer) - one of these drops the prisoners & killing completes the mission.
1 Centior Misshape (Destroyer)
Faction: Blood Raiders
Mission type: Deadspace
Damage dealt: EM/Thermal
Extras: NOS by Corpior Converter
Recommended damage dealing: EM/Thermal
Completed in: Arbitrator (T1 with 1x Reflective, 2xThermic membranes - T1 med drones) DR: Easy
Single Stage
Warp in, 4 groups. Attack in any order - all groups aggro independently.
Group 1 @5-10km - instant aggro
2 Corpum Sage (Cruiser)
Group 2 @30-40km
5 Corpii Reavers/Engravers (Frigate)
1 Corpior Fanatic (Battlecruiser)
Group 3 @30-40km
5 Corpior Visionary/Converter (Destroyer)
2 Corpior Seer/Bishop (Battlecruiser)
Group 4 @60-70km
3 Corpum Arch Sage/Arch Priest (Cruiser) - one of these drops the prisoners & killing completes the mission.
Blitz: once you've dealt with the initial 2 Cruisers you could just go for the Arch Sage group.

Faction: Blood Raiders
Mission type: Deadspace
Damage dealt: EM/Thermal
Extras: NOS
Recommended damage dealing: EM/Thermal
Completed in: Arbitrator (T1 with 1x Reflective, 2xThermic membranes - T1 med drones) DR: Easy
Stage 1
Warp in, 5 groups. Once dealing with the instant aggro from group 1 the remaining groups are at extreme range. All ships may aggro on attacking any one ship. Ships may also switch target to aggro drones if drones attack the sentries. The Tower Sentries are proximity activated and will aggro as soon as you get within 80km, so going for one of the middle ones will possibly put you in range of 2 others. Tower Sentries range is limited to 80km.
Group 1 (middle-left) @10-15km - instant aggro
2 Blood Heavy Missile Battery
2 Corpii Engraver
Group 1 (left) @100-115km
1 Tower Sentry Bloodraider II
1 Corpum Arch Templar/Arch Reaver
Group 1 (middle-left) @100-115km
1 Tower Sentry Bloodraider II
1 Corpum Arch Templar/Arch Reaver
Group 1 (middle-right) @110-140km
1 Tower Sentry Bloodraider II
1 Corpior Seer
Group 1 (right) @100-115km
1 Tower Sentry Bloodraider II
1 Corpum Arch Templar/Arch Reaver
Stage 2
Note: the large numbers of structures present can cause this stage to lag.
Group 1 (middle-left) @10-15km - Initial aggro at warp in.
5 Corpii Seeker/Raider/Collector/Reaver/Engraver (Frigate)
2 Corpior Seer (Battlecruiser)
Group 2 (middle-right) @20-30km
3 Corpii Seeker/Raider/Collector/Reaver/Engraver/Diviner (Frigate)
2 Corpum Sage/Dark Priest/Shadow Sage (Cruiser)
Group 3 (left) @100-110km
4 Corpii Seeker/Raider/Collector/Reaver/Engraver/Diviner (Frigate)
2 Corpum Sage/Dark Priest/Shadow Sage (Cruiser)
Group 4 (right) @20-30km
3 Corpii Seeker/Raider/Collector/Reaver/Engraver/Diviner (Frigate)
3 Corpum Sage/Dark Priest/Shadow Sage (Cruiser)
Stage 3
Warp in, 3 groups. Attack in any order - all groups aggro independently.
Group 1 (middle) @60-70km
2 Corpior Visionary/Converter (Destroyer)
2 Corpior Seer (Battlecruiser)
Group 2 (right) @100-110km
5 Corpior Converter/Templar/Shade/Fanatic (Destroyer)
5 Corpus Apostle/Archbishop (Battleship)
Group 3 (left) @80-100km
5 Corpior Converter/Templar (Destroyer)
5 Corpior Shade/Fanatic (Battlecruiser)
5 Corpus Harbinger/Cardinal/Patriarch (Battleship)
Destroy the Dark Blood Chapel and pick up 3 hardwire implants.
No other structures contain loot.
Faction: Gurista Pirates
Mission type: Deadspace
Damage dealt: Kin/therm
Reccomended damage: Kin/therm
Completed with Raven (3x kin hardeners)
1st room -- two BC, 2 sentry tower III, 4 des, 2 frigs
2nd room -- immediate agro from 1st goup at range of 7km ... one cruiser, two webbing frigates, one webbing elite frigate
groups 2 thru 5 will not agro until attacked
g2: 3 cruisers
g3: 2 cruisers, 4 frigs
g4: 2 cruisers, 4 des
g5: one BC, 5 des
3rd room -- immediate agro on warp in from 1st group of four frigates and two cruisers -- range under 10km
remaining groups will not agro until attacked unless you attack the control tower -- then they ALL agro immediately
g2: 3 BC near the tower. There is no proximity agro afaik ... i got within 14km and it didn't happen
g3: [left side] 4 Bs [800k to 1m]; 6 BC; 4 elite jamming frigates
g4: 4 BS [1.25m each], 5 BC, 5 des
My Raven was unable to deal damage fast enough on the BSs in group three while equipped with six cruise missile launchers. Had to leave and re-arm with torps.
After salvaging all wrecks from groups 1 thru 3, I destroyed the Control tower, grabbed the loot, and warped out.
Ganged partner inside the room was not attacked at all, except by the inst. argo groups in room 2 and 3. Suspect this would have stayed same as long as it attacks nothing. Salvaging was safe for this char.
After you warp out against g3 or 4 in room three, the remaining ships will return to their start position and wait. Re-entering the room will not cause them to agro again until attacked.
Only those ships that attack something [ship, tower, sentry] will be attacked by any rat other than the 'instant agro' groups.
Blitz; Destroy the Sensor Structure (Suldok)
Damage Dealt: EM/Therm
Reccomended Damage Dealing: EM/Therm
Completed with: T2 General-Purpose Fit Nighthawk DR: Easy if you blitz it. Hard if you kill everything. (Ixtelle)
Stage 1:
1 group, insta aggro, 2x Sentry, 2x Cruiser, 3x Frig.
Stage 2:
4 groups, no aggro:
Group 1:
1x BC, 5x Frig
Group 2:
2x BC
Group 3:
2x Cruiser, 4x Frig
Group 4:
2x Cruiser, 4x Frig
Stage 3:
2x BC aggro at warp in.
After that, there are 3 groups at 60 - 100km
Group 1:
5x BS
6x BC
4x Frig (Web / Possible Scram)
Group 2:
2x BC, 4x Frig
Group 3:
5x BS
5x BC
4x Frig
All BS's were 1.1mil or 1.2mil targets.
Blitz: Destroy the target structure and warp. It pops very easily.