Worlds Collide, Level 4
Last edited by SagiKov
Fri, 02 Sep 2016 10:49 UTC
Fri, 02 Sep 2016 10:49 UTC
Faction: Angel and Sansha
Mission type: Encounter
Space type: Deadspace
Damage dealt: All damage types, see notes - Mainly Exp, Kin (Angel) / EM, Therm (Sansha)
Web/Scramble: All Elite Frigate types. Spy frigates only webs.
Extras: Target Painters (Angel Arch Gistum Crusher)
Recommended damage dealing: Exp, Kin (Angel) / EM, Therm (Sansha); Max orbit 49km (Centus Dark Lord)
Recommended ships: Sleipnir, Raven, CNR, Drake
Video: http://youtu.be/Tv3TZ0dC23k
Note: Heavy drone aggro in Angel & Sansha Pocket 2. Setting drones to passive in order to avoid accidental aggro is recommended.
This is not a drone friendly mission. However, one thing I notice since the AI update is a "glitch". If you do not shoot anyone, and you release more than one drone shooting at one target. Once they start shooting at one of your drones you can scoop that drone back into the bay. The foes should not shoot at your other drones. This "glitch" maybe fixed down the road.
This is a time consuming mission if you do both the Angel & Sansha sides.
Pocket 1 (War Zone)
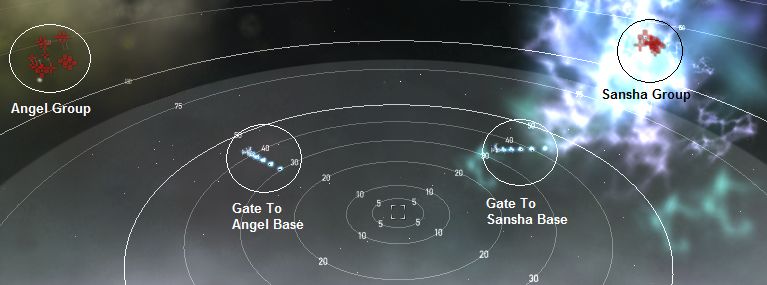
The two gates are locked until you kill the trigger ship from each faction. The trigger ships are ALWAYS a Gist War General and Centus Savage Lord from the respective groups.
NO aggro from the initial groups until you attack them. Each group can be aggroed independently.
Drones can be safely deployed to attack any group with aggroing the entire pocket.

Angel Group
4x Elite Frigates (Arch Gistii Impaler/Hunter) Web/Scramble1x Elite Cruiser (Arch Gistum Smasher/Crusher) Target Paint (Arch Gistum Crusher)
5x Battlecruisers (Gistatis Primus/Tribuni)
3x Battleships (Gist War General/General/Commander) Gate Unlock Trigger (Gist War General)
NOTE: I notice since the AI update the ships react to the type of drones you use. While using long range sentry drones the foes try to get out of the drones ranges by getting closer. While using short range sentry drones the foes try to move away.
Sansha Group
3x Elite Frigates (Centii Loyal Ravener/Scavanger) Web/Scramble3x Battlecruisers (Centatis Specter/Wraith)
4x Battleships (Centus Savage Lord/Overlord/Beast Lord/Dark Lord) Gate Unlock Trigger (Centus Savage Lord)
Tip
- The NPC ships will not travel more than 30km from their respective spawn points.
- Drones/fleet members maybe targetted as the NPC ships reset their targetting when moving back to their spawn points.
- Move to a sniping position near the respective gate, roughly 75-80km (recommended distance) from the Angel Asteroid Outpost or Sansha Watchtower. They will travel back and forth in a merry-go-round while you snipe.
Pocket 2 (Angel Base)
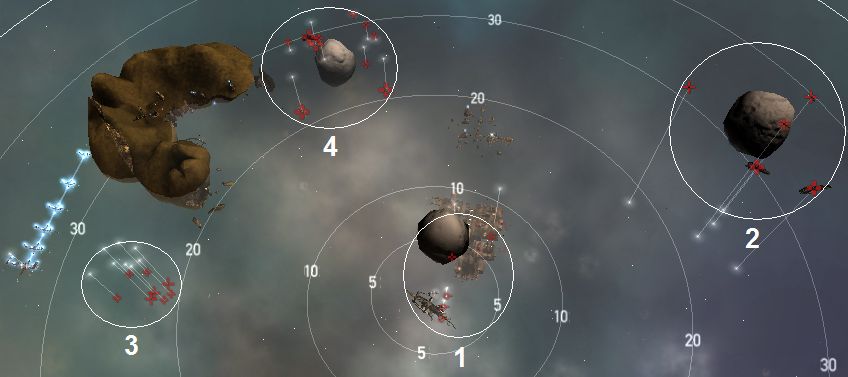
On warp-in, Group 1 will auto aggro. The Angel Spy frigates do not scramble but they do web. DO watch for Thugs and Outlaws srcams. All ships in this pocket have to be destroyed to unlock the gate.
Warning
- DO NOT deploy your drones to attack Group 1. (I'm going to say this is optional. I didn't move and I had my drones attack group 1 with no problem. However, everyone in the room did target my drones and not me. T1 hobgoblin)
- Any attack on the Angel Spy frigates by fleet members will aggro the entire pocket. It is safe however, for them to kill the sentry guns in Group 1.
- The FIRST ship that had warped into the pocket may kill the Angel Spy frigates without repercussions, as long as you stick to turret weapons/missiles.
NO aggro from the other groups until you attack them. Each group can be aggroed independently.

Group 1 (Auto-aggro):
2-3km from warp in2x Frigates (Angel Viper (named Angel Spy)) Web
3x Angel Sentry Guns (Tower Sentry Angel III)
Group 2:
3x Battlecruisers (Gistatis Praefectus/Tribuni)2x Battleships (Gist Saint/Warlord)
Group 3:
20-30km from warp in5x Destroyers (Gistior Seizer/Thrasher)
3x Elite Cruisers (Arch Gistum Phalanx/Centurion)
Group 4:
20-30 km from warp ni6x Elite Frigates (Arch Gistii Thug/Outlaw) Web/Scramble
4x Battleships (Gist General/Commander)
Random Spawn (Auto-aggro):
1x Battleship (Angel Overseer)Tip
- Once Group 1 has been eliminated, it is fairly safe to deploy your drones for the remaining groups. Keep a close watch on your drones’ target to ensure that they do not stray and mistakenly attack a neutral group.
- Recommended order for elimination : Group 1, Group 2, Group 3 and finally Group 4.
- An Angel Overseer battleship will have a random chance to spawn in this pocket. The chance to spawn seems to be based on triggering the Angel Base warp gate in Pocket 1 and then completing the warp into this pocket.
Pocket 2 (Sansha Base)
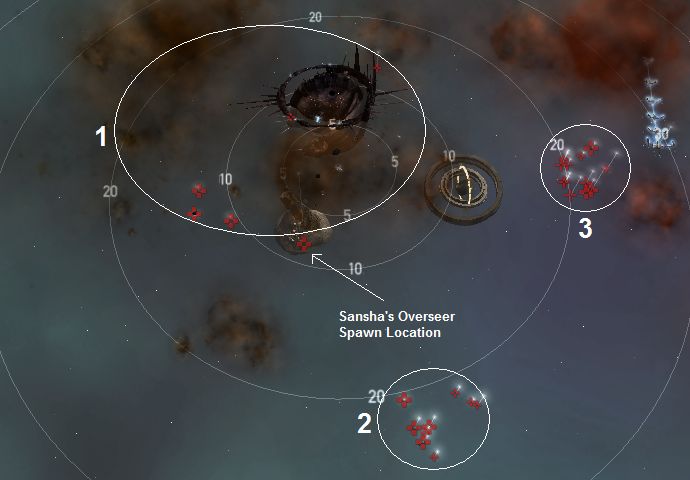
On warp-in, Group 1 will auto aggro. The Sansha Spy frigates do not scramble but they do web.
Warning
- DO NOT deploy your drones to attack Group 1.
- Any attack on the Sansha Spy frigates by fleet members will aggro the entire pocket. It is safe however, for them to kill the battleships in Group 1.
- The FIRST ship that had warped into the pocket may kill the Sansha Spy frigates without repercussions, as long as you stick to turret weapons/missiles.
NO aggro from the other groups until you attack them. Each group can be aggroed independently.

Group 1 (Auto-aggro):
2x Frigates (Sansha's Berserker (named Sansha Spy)) Web3x Battleships (Centus Dread Lord/Savage Lord/Dark Lord/Beast Lord)
Group 2:
5x Destroyers (Centior Monster/Abomination)4x Battleships (Centus Dark Lord/Beast Lord/Overlord)
Group 3:
4x Elite Frigates (Centii Loyal Scavanger/Ravener) Web/Scramble5x Elite Cruisers (Centum Loyal Hellhound/Fiend)
3x Battleships (Centus Savage Lord/Plague Lord/Mutant Lord/Slave Lord)
Random Spawn (Auto-aggro):
1x Battleship (Sansha’s Overseer)Tip
- Once Group 1 has been eliminated, it is fairly safe to deploy your drones for the remaining groups. Keep a close watch on your drones’ target to ensure that they do not stray and mistakenly attack a neutral group.
- Recommended order for elimination : Group 1, Group 2 and finally Group 3.
- An Sansha's Overseer battleship will have a random chance to spawn in this pocket. The chance to spawn seems to be based on triggering the Sansha Base warp gate in Pocket 1 and then completing the warp into this pocket.
Pocket 3 (Research Outpost)
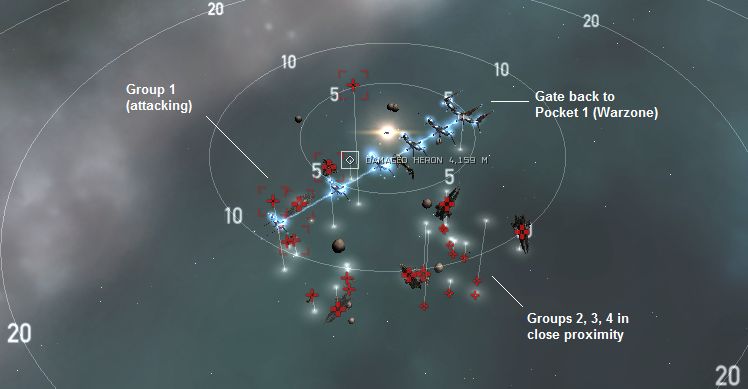
You will warp-in randomly around 5km from the Heron. In addition to the immediate aggro from Group 1, there is a small chance that one or more other groups will aggro due to proximity triggers.
If this happens, start moving away from the remaining neutral groups and check if the webbing/scrambling Elite Frigates have you locked. Kill them first if they have you locked.
If you are fleeted with friends, have them focus fire on Group 1 or any groups that have been aggroed by mistake.
The FIRST ship needs to act as an Fleet Commander and assign the appropiate targets. A common mistake is to have everyone shoot random or their closest target, which leads to the whole pocket being aggroed.
Sometimes fleet members that enter later will land differently and aggro groups that were unaggroed. If this includes the elite frigates and they scramble the new arrival, it can mean a quick death. All fleet members should have at least enough tank to survive until the scramblers are cleared. Having the lead ship tank the entire pocket is extremely difficult, as it can put down 1300-1500 dps, in a wide variety of configurations. Here are some (extreme) examples:
- 50% Exp, 31% Therm, 16% Kin, 2% EM
- 63% Exp, 15% EM, 15% Kin, 6% Therm
- 58% Exp, 23% Kin, 12% EM, 7% Therm
NO drone aggro for the entire pocket. You can deploy drones normally.

Group 1:
3x Elite Cruisers (Arch Gistum Phalanx/Centurion)2x Battleships (Gist War General/Warlord)
Group 2:
4x Battlecruisers (Gistatis Legionnaire/Primus)1x Battleship (Gist Warlord/Malakim)
Group 3:
5x Destroyers (Gistior Thrasher/Seizer)3x Battleships (Gist Saint/Warlord/Malakim)
Group 4:
4x Elite Frigates (Arch Gistii Hijacker/Rogue) Web/Scramble1x Battleship (Gist Nephilim/Cherubim)
Tip
- Warping-in from either Angel or Sansha Base does not change the ship combination for this pocket. It will always be Angel ships.
Blitz
- Pocket 1 : Unlock the Angel Base gate either using a Zbikoki's Hacker Card (or killing the Gist War General). The card will be consumed upon activation.
- Pocket 2 (Angel Base): All ships in Pocket 2 have to be destroyed to unlock the gate.
- Pocket 3 (Research Outpost): Destroy Group 1, grab the hostages from the heron, fly back to your agent. No need to destroy entire groups. - confirmed in July 16, 2014.
- The Zbikoki's Hacker Card can be found in Zor's wreck in “RightHandofZazzmatazz4 The Right Hand of Zazzmatazz” or "DamselInDistress4 Damsel In Distress" Level 4 mission.
Video
This video is one of many ways to do this mission. (The game got super glitch during the video. (I gave the GM a heads up) Anyways, I'm going to redo this mission down the road)I did leave out the fact you need to pick up the guys and bring them back to your agent.http://youtu.be/Tv3TZ0dC23k
Bounty
26,300,000.00Loot + Salvage
13,500,000.00CategoryMissions
CategoryLevel4
warp in: I've found you can unlock the gates to the cartel base just by killing the gist BS, so unless you are a die hard everything dies player you can leave the frigs.
I've just shot both the Angel Spy on the first gate in the angels room and I didn't aggro anything else. What I do is alight for warp before they get into 10k web range and shoot the guns. by this time I am webbed and slighty further back from the warp in point
It is safe to shoot them here.
Once Angel Spies/towers are dead, other enemies can be safely engaged, it doesn't cause whole room aggro anymore.
Pocket 2 (Sansha) Battletower dropped loot T1 Stuff
Pocket 2 (Angel) Battlestation dropped T1 Stuff
Pocket 3 No Loot Dropped
On the Sansha side, there are 3 Centus Overlords, and 1 Centus Savage Lord
I'm using a Navy Issue Apoc. In the lows: 3 heat sinks, 2 thermal, 2 kinetic hardeners II and a LAR II.
Correct shield hardner for each pocket is important. I use a rail (Blasters might be better or not) fitted rokh with T2 stuff and nav ammo. An afterburner is worth the slot, and you need lots of ammo too. The mission takes time. So don't make any plans for the next few hours. Very very hard mission. Watch your agro!!!
Pocket 2 (Angel): You might need to sacrifice drones so you can get some distance at the start (Angel spy) or tank them if no web. Maybe take out a group or two first. Warning: Group 4 warp/web scrambles like mad. Frigates are though to take out. (Lots of dps in here) If you mess up. Warp out immediatly and warp back in and start over.
Pocket 3: Get distance while shooting at group 1. Not all the pocket will agro at once. So shoot one ship and wait. Be careful they hit like a hammer.
Onlyd did pocket 1, 2a & 3
Bounty: 17,4 mill (pocket 1 & 2a: 9,3 mill)
Mission: 2,1 mill
Loot and salvage: 19,5 mill
Total: 39 mill
- Overseer, when it spawns, will cause pocket aggro when shot. Even if you shoot him from 40 km away.
- It's not true that you cannot use drones.
You can get to 20-25 km away, there's a building ahead of the warp arrival point that can be used as reference.
Then you can shoot at the two auto-aggro Angel Spy frigates, as long as the roaming other frigates (group 4's) don't cross your drones path. When this happens, I never got them to aggro but they aggro the drones and kill them in few seconds.
By watching the roaming frigates path so that they are 18km or above away off you, you can attack the two webbing frigates at will. Every time the other groups closes in again, you have to recall the drones fast.
For me, pocket 3 was consisted entirely of Blood Raiders, NOT Angels. Be prepared to warp out quick if you're equipped for Angels. The pocket was not too difficult once I came back with Blood gear.
From my recollection, the pocket had 3 groups. Group that auto-aggroed consisted of 3 elite cruisers and 2 battleships. The other two had cruisers/BS and also some frigates with web/scramble. The groups were very easy to tank one at a time. No problem using drones either.
In Pocket 3, the BS for Group 2 and 4 used Target painters, no initial aggro from Group 1. (shoot Group 1-2-4-3).
The sansha overseer had a 3.75mil bounty and absolutely melted to my ravens 330 dps(only just trained into it ^^), went down in about 20 seconds. Dropped a true sansha crystal tag, sansha radio L and an assortment of other equally worthless mods.
The angel overseer had a bounty of slightly less than 1 mil and was the same as a normal bs to kill. Dropped a few meta 0 mods, not even a tag or faction ammo.
Might farm this one for the week to see if anything nice comes from it, will at least give it another go after downtime today : )
Bounty: 25.50M
Salvage: 11.15M
LP: 6380 x 1000 = 6.38M
Loot: 3.25M
Reward: 3.54M
---
Sum (no salvage): 35.42M
Sum (excl. LP): 43.44M
Sum: 49.82M
Mission (undock - reward): 107.5 min
Salvage (undock - dock): 25 min
---
Sum: 132.5 min
Ship: Raven (T2 some faction)
Pilot: 17.35M skill points
ISK/h: 22.56M/h
ISK/h (no salvage): 19.77M/h
ISK/h (blitz): ?
Also in the final pocket, there was no auto-aggro. I couldn't easily tell groups because everything was so close (within 10km or so), so I burned away, picked one thing, shot it, then it's group when they aggroed and so on.
I only did the Angel side, RL got in the way before I could go back and do the Sansha side, but it was pretty easy with an anti-Angel tank fitted.
Both sides completed in a couple of hours, salvage and all
Just farmed this mission and got both Overseers every time. Bare with me if this description is waffley, what to do is easy but describing it well is more tricky.
Sansha first (though the principle is the same for each). After killing all Sanshas make sure you are over 5km from Sansha gate between the gate and the Sansha base, approach the gate manually (by double clicking in space just ahead of the NARROW end of the gate. Travel to just beyond the NARROW end of the gate so your ship will be flying perpendicular to the direction of the gate. Once within 2500m, hit warp. This should cause Sansha Supervisor spawn.
Angel second. Again, you want to be between the Angel Base and the Gate. Manually fly your ship so it is parallel to the direction of the gate. Fly along side the gate till you reach just beyond the NARROW end of the gate, then cut across the gate so you are flying perpendicular to the direction of the gate. Once within 2500m, hit warp. This should spawn the Angel Supervisor.
Do not use the gate icon to approach as this takes you to the BROAD end, when approaching. Only use it when you have arrived and wish to initiate warp.
Good hunting.
Have only got 5 supervisors over 1m bounty. Of these lot, 4 supervisors only had faction amo drops, but one dropped 3 faction items, 625mm autocannon, EM shield hardener and cruise launcher.
Also noticed that sometimes you can avoid the initial web in the 2nd room if you target the 'other' initial agro ships and not webbers(this only works about 25% of the time)
As for Radagan's claims, the last couple of times I've done this mission and its variants there have been Supervisor's in every "Base" pocket. Nothing fancy needed, although most of the time the bounties were pretty low.
I have been farming World's Collide with the trick RadaganSchneider described for a few months now. People have been asking so I put up a video to show where you are supposed to activate the gates from.
http://youtu.be/52PR79TbNPw
I prefer the other less reliable way to get the big bounty ones though.
No Veldspar in Sansha Base pocket.
Veldspar in Angel Base pocket: 378521
Veldspar in Research Outpost pocket: 349142
Total Veldspar: 727663
TechReviewsAndHelp.com
i seem to be unable to force any spawns, but i might be doing it wrong.
i did however get a spawn without trying to, so there are still supervisors about
TechReviewsAndHelp.com