Infiltrated Outposts, Level 4


Last edited by JeanInkura:
Replaces old-style internal links with new pipe-split links.
Mon, 16 Oct 2017 08:49 UTC


Faction: Drones
Mission type: Encounter
Space type: Deadspace
Damage dealt: Explosive/ Kinetic
Web/ Scramble: Elite Frigate
Recommended damage dealing: EM/ Kinetic/ Thermal
Recommended ship types: Battleship, Battlecruiser, HAC, Tengu, Dominix
Video: Ishtar, Golem, Raven, Machariel


The number of ships in groups may vary.

No Hostiles at initial gate.


1st Pocket

Auto aggro from the 1st group, 2nd group remains neutral.

1st Group (27- 30km)

3x Frigate (Sunder/ Raider Alvi) Web/ Scramble
2x Cruiser (Viral Infector Alvum)
1x Battlecruiser (Defeater Alvatis)
1x Battleship (Swarm Preserver Alvus)

2nd Group (46- 52km)

3x Frigate (Decimator/ HUnter Alvi) Web/ Scramble
2x Cruiser (Viral Infector Alvum)
1x Battlecruiser (Defeater Alvatis)

The warp gate to the next pocket is ~33km away and locked until all hostiles are cleared.
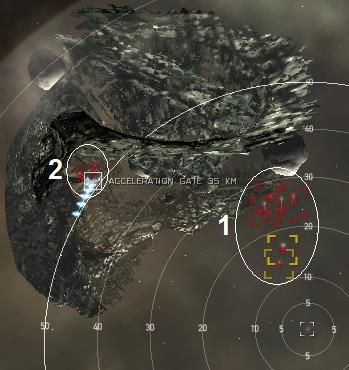

1st Pocket


2nd Pocket

Attacking the 2nd Group (or its bunker) will aggro the entire pocket.
Attacking either the 1st or 3rd group will aggro the 2nd group.
Drones that get too close to any remaining neutral group will be attacked.

1st Group (45- 50km)

5x Elite Frigate (Strain Infester Alvi/ Strain Decimator Alvi) Web/ Scramble
5x Cruiser (Devastator/ Disintegrator Alvum)
1x Battleship (Alvus Controller)

2nd Group (50- 75km)

1x Frigate (Devilfish) Web/ Scramble
2x Elite Frigate (Strain Infester Alvi)
5x Battlecruiser (Rogue Drone Colonel/ Crippler Alvatis/ Enforcer Alvatis)
2x Battleship (Swarm Preserver Alvus)

3rd Group (75- 85km)

4x Frigate (Raider/ Devilfish Alvi) (Web/ Scramble)
2x Elite Frigate (Strain Infester Alvi)
3x Cruiser (Devastator Alvum)
2x Battlecruiser (Enforcer Alvatis)
1x Battleship (Swarm Preserver Alvus)
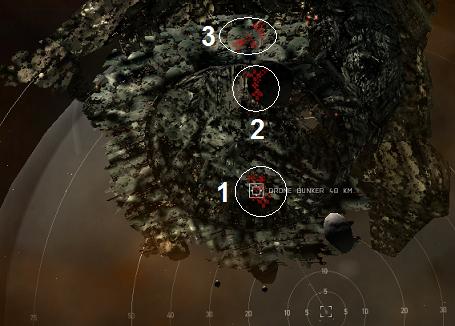

Second Pocket


Blitz
Eliminate all ships in the 1st pocket to unlock the warp gate.
Eliminate all ships in the 2nd group and destroy the Bunker, done.

Tip
Mission is flagged completed after you have eliminated all ships in the 2nd group of the 2nd pocket and destroyed the bunker next to them.
The drone bunkers in the 1st pocket are not part of the mission objective, so they can be ignored.
Fitting an Afterburner might be useful to burn to the gate.

Mining
1st Pocket: 16x Veldspar asteroids (1,2 mil Units)
2nd Pocket: 49x Veldspar (26- 94km, 982k Units) and 7x Scordite asteroids (39- 84km, 810k Units).

Structure
No loot from Structures.

Loot and Bounty
Salvage: ~2.5 mil
Bounty: ~3.9 mil


CategoryMissions
CategoryLevel4
Comments
Comment by TomSchlong
2008-06-25 08:39:39
In a Raven: 1x EXP, 1x KIN, 2x Invul, 3BCS, deal: EM, 2 pockets
pocket1 fly directly to gate, shoot ships on your way
pocket2: attacking the nearest group to you aggros the second group next to it. I killed them all before anything happened really. Shield never went lower than 70% unboosted. Killing the 3rd group is easy too.
Lastly destroy the three "drone bunkers".
MY difficulty rating for this mission is: very easy for Level 4.
Comment by BlasTerd
2008-07-01 11:55:16
Golem or CNR should not be placed as "recommended" ships , as it's the case in many other missions.
Any t1 non faction bs can finish the mission with 2x explo hardeners, 1x kin + 1x thermic + 1x Em hardeners.
Stop recommend very expensive ships when "normal" ships are easily able to finish missions please.
Comment by JohnKarnage
2008-07-01 15:25:03
Recommended ships come from the people that run the missions. These are the ships that they completed the mission in. It used to say: Completed In:
Comment by RamZahn
2008-07-04 11:30:28
While this might, with some reservations, be deemed as an easy mission it has, on the other hand, one of the most lovely spatial designs I have seen so far.
Shades of 'Tannhauser Gate'...
Comment by KristosJahlon
2008-07-05 00:03:01
This mission takes less than 15 mins in a Nighthawk, roughly 20 in a Drake.

BS really doesn't shave much time off that given the massive amount of frigate size ships.
Comment by CaddE
2008-07-29 01:23:54
In reply to KristosJahlon:

That depends on what you have on that BS, i have huge turrets but finish it in 10 - 12 minutes. All you i need against the small ships is 30 km's distance and 0.001 angular velocity. (Or less than 30 m/s transversal).
They go pop-pop-pop purty quick, those who make it through are dronefood.
Comment by SheraadO
2008-07-30 04:51:31
On a megapulse abaddon I've done this mission about 5 times recently and not once run out of shields, even. Pathetically easy. I wouldn't outright suggest taking no tank, but I used LAR+2 hardeners just as safety net (very few scramming drones anyway) and filled up on HS/TE. The TE especially nice for the masses of frigs.
Comment by NahorNoom
2008-08-15 23:44:42
Found this mission fairly easy, i did have extra firepower watching my back, but i found when i warped into the second room, i could draw complete aggro, align, and just move off, i never had more than 5 ships in range at a time. even solo i wouldnt have had any trouble.
they never broke my shields, but i used a tempest, 100mn AB II with LAR II, 2x explo II and 1x kin + therm II
Comment by PorlenzColhart
2008-08-31 20:45:55
Easy mission. With an armor tank 'Phoon used 1xExp, 1xKin and 1xTherm (I have an anti-explosive pump). Only had to run one repper most of the time.
Comment by KhurI
2008-09-05 18:49:59
I agree, this mission gets a "very easy" on my rating.

I'm flying a sleipnir fitted with
7x scout autocannons, 1x HAM launcher
t2 large shield booster, t2 boost amp, t2 AB, t2 kin and exp hardners.
t2 damage control, t2 gyrostab, and the rest being cap flux coils.

Not being the best tanking ship in the world, I normally rely on a bit of speed to avoid fire from most hard hitting ships. However, after being webbed to a complete standstill, I could tank the entire third room with out taking any shield damage a single boost cycle couldn't fix.

They die pretty easy too.
Comment by KaelStarfly
2008-10-09 10:49:58
Ran this in a Maelstrom passive tank set up. Had no problems. I never had to turn on my invulnerability fields, and never dropped below half shields.

Easy mission, but don't expect to get rich on it. No bounties, and the salvage / loot only came to 4 mil.
Comment by RilWar
2008-10-11 14:12:08
2nd Pocket, I 1 volleyed the bunker to blitz it, the whole pocket didn't even aggro me.
Comment by ThaddeusBrutor
2008-10-14 09:38:33
All T2 fitted Abaddon (8 MPL, 2 LAR, 3 Resist (2 EANM/1 DC)
Pulverized the mission. Scorch was really handy for clearing this fast.
Comment by BuraKumin
2008-12-17 13:23:41
I have 4.6m SP's. I fly a Hurricane. ( Passive Shield Tank ).
Just completed this.
This was the FIRST level 4 mission I have ever done/gotten. I was scared because i researched this mission before trying it and even let the bonus period slip waiting for corp mates to come from 0.0 to give me a hand as i read about people losing battleships to this mission. HOW!?!? i decided to try solo.. Lol.. i just cheesed this mission in 45mins. Here's my loadout.. oh and in the 2nd room, i got each pocket to come alone without aggroing group 2 etc.. and my drones seemed to bug and fight unlocked targets from 81km.. when they are supposed to limit at 35 ;)
:: 6x dual 180 M AC's :: 4x t2 LSE :: 1x meta2 Warp Stab ( useless ) :: 1x t2 Gyro :: 4x t2 SPR :: 2x arbalest heavy ass launchers. used standard emp and torrents. 2x t1 infiltarator medium drones, 2x t1 light acolyte drones. :: and uh.. oh yeah.. 4.6m SP.
Comment by TekPede
2009-01-13 16:56:32
I would suggest a Drake. BS is overkill. It is very easy.
Comment by ShukakuGaara
2009-01-21 09:48:59
really easy in dominix w/t2 ogres

i hope this help somebody:

condensed alloy - 51
crystal compound - 36
dark compound - 50
gleaming alloy - 150
glossy compound - 28
lucent compound - 97
lustering alloy - 114
motley compound - 173
opulent compound - 4
plush compound - 75
precious alloy - 198
sheen compound - 172

also notice that drone salvage is really poor, 1m or so
Comment by RannisIronfist
2009-01-21 20:17:30
1st room ~1.2M Veldspar (2x50K 1x~110K, 3x100K 10x70K)
2nd room ~1.3M Veldspar (27x10K, 2x100K, 15x50K) 490K Scordite(7x90K)

managed to mine all but a few of the 10K roids and still get the bonus with Hulk, TII crystals at 1577M^3/minute

also salvage seems random as i got 4 trit bars and about 2.5M total salvage
Comment by KeryNysell
2009-02-23 17:19:39
Ahem ... 7x90K of Scordite is 630K ... and I've just mined 32x10K of Veldspar in the second room, but all my other numbers are the same (amounts in the roids in the first room, and the 50K and 100K ones in the second room).
Comment by OovarvU
2009-06-22 20:35:14
easy missions rarely give out good loot as far as i can tell
Comment by MrT
2009-08-06 16:44:10
Pocket 1: Very easy
Pocket 2: Fairly easy
Beautiful spatial design.
Bounty: 0
Mission: 2,2 mill
Loot and salvage: 5,1 mill
Total: 7,3 mill
Comment by JackUnderhill
2009-08-27 15:05:24
Completed Beam Zealot/Beam Navy Omen: Aurora helps if you've got it. Completed Cerberus: Scourge and both t2 variants; Inv, EM hard, Exp Amp, AB; BCS x3. Miniscule damage at mid-sniping range (45km) to undetectable at much over that. Battleships were not hard to bring down with Scourge Fury.
Comment by SerinGol
2009-10-02 12:17:09
Completed in an Ishtar.
Used a 10MNII AB and a Medium Shield Boost II and never got into my armor tank.
Comment by BossStubs
2009-10-04 16:40:49
Completed in a drake
forgot to turn hardeners on, never dropped shields below 75%
Very easy mission
Comment by MaciejSimm
2009-11-20 22:44:47
Finished in a t2 blaster deimos with antimatter shot. Like melting butter in a microwave.

7000LP in < 20 min. Hope to get this one again soon.
Comment by AsCendancy
2010-01-25 19:31:07
done in t2 paladin

http://www.youtube.com/watch?v=D8QdBkNocfM
Comment by Dethbringer1
2010-02-18 23:49:27
I finished this mission in a Myrmidon. If anyone is curious.. I used 200mm compressed railguns. Magnetic vortex stab, Named Webifier, Nonlinear Trac. Stab., Med. Arm. Rep., Explosive and Kinetic hardeners, warp stabilizer. Damage control. All of my Modules are tech I, but they are all named items. For payment I got about 1.7M and I got about 4.9M in loot. I made a total of 6.652M off this mission. Jita prices for loot. Almost lost my 40M ship waiting for 75k worth of hammerheads to return. I will never learn. I found the mission very easy but very time consuming. I am not used to spending 2hrs on a mission although this was my first solo lvl4. Also my last drone mission if I can help it! I have about 3.6M SP but mostly in non combat areas such as learning, marketing, science and engineering. So I don't have the dps or tanking skills most commentors likely have.
Comment by WikiThaedius
2010-02-25 02:34:54
Fairly easy in a 2xLar, 3 Hardener Domi. Sniping frigate-sized drones with a single volley from 30k+ was a must, lest I have to pull out the Hobgoblins and wait for them to chew at the small ones. Tank wasn't too bad. Don't bother looting the bunker - I got 1 gleaming alloy.
Comment by VicRor
2010-04-05 15:14:15
The bliltz still works. Whoever said it doesn't or whoever edited it didn't confirm this info. Someone must have got the groups mixed up cause you get full aggro and can be confusing what ships are in the second group.
Comment by PinkDaddy
2010-04-09 17:16:45
BLITZ: Kill Group 3 and 2, Kill Bunker.
Comment by ChiGo1
2010-04-11 17:00:03
Confirm - blitz works as before by killing group 2 and its bunker. Tip: fleet with an alt/buddy, tag the group 2 ships and bunker before shooting anything. Easy then to track the required targets.
Comment by RentBoyUk
2010-04-14 10:06:10
Completed in Caldari Navy Raven. Easy mission, just attacked anything I wanted.

High slots:
7 x XT-9000 Cruise Missile Launchers loaded with Paradise Cruise Missiles
1 x Drone Link Aug

Mids:
2 x Invulnerability Field II
1 x Ballistic Defelection Field II
1 x Explosion Dampening Field Field II
1 x Caldari Navy X-Large Shield Booster
1 x Caldari Navy Shield Boost Amplifier

Lows:
2 x Ballistic Control System II
3 x Capacitor Flux Coil II

Rigs:
3 x Large Capacitor Control Circuit
Comment by IdoCrase
2010-06-13 07:26:14
Okay. Ran this last night with my new, and somewhat experimental LiveStream account recording events. I plan to start regularly recording my missions when i run them, and hope that they will help.

http://livestre.am/8MeU

Text can just be read if you fullscreen. Please excuse my habit of surfing/chatting during the mission, and in asploding the structures (I timewaste terribly) - this was just to prove the idea could work, and is really a 1st draft.
Please let me know if the video was informative, crap, whatever, and if you think it is a good idea, Livestream IS free, and they archive your videos for free too. I am looking into finding out how to download them as well.

Completed in a Nighthawk, 30 minutes because i screwed around, probably 20 if it was a 'clean' run.
Fitting in video.
Comment by PaseShifter
2010-07-01 19:16:04
I believe there is nos from Alvus Controller. My cap went down 100-200 every 20s without any mods active.
Comment by RobbieCrash
2010-08-11 19:26:37
Completed in a hurricane with T2 720s and tremor ammo.

I see why the mission can be hard, if you get webbed by the 4 drones in pocket 2, you're in trouble. I went from full tank to 20% structure in about a minute and a half. If you sick your drones on them right away, it's a cake walk.
Comment by CreatPosudol
2010-09-04 11:46:52
I accidentally shot group two in the second stage and got stage aggro, so I had to warp out. After warping back in (I waited a while before shooting) I could shoot pretty much everything without them even shooting back, only the last group (not sure which that was originally, but I assume group two) caused the remaining ships to aggro. Also I only had one tackler/webber in that pocket (lucky I guess)...
Comment by KreTark
2010-09-19 14:03:49
I didn't move after warpin and was able to kill both group 1 and 2 without getting aggro from group 3. I only assigned drones to ships within 30km btw
Comment by NardoGold
2010-12-05 16:17:36
I completed in a shield tanked mega, but had to warp out once due to no shield boosters. I used Kinetic Amp II, Expl Amp II, Invulnerability Field II, Balistic Deflection Field II... Used EM drones
Comment by Gunner75
2011-03-07 15:55:49
Just finished this mission on a Golem, yes it was entirely too easy but that is my mission ship. As far as compounds and alloy drops, original post says 1000m3 of loot. hardly in my case. i salvaged and looted all structures and wrecks and came up with 854m3 no where near the 1000m3 as stated.
2011-04-21 14:53:17
Did this in Tengu. Even shot the gigantic scenery structures and a few of the asteroid outposts. Took me 12 minutes.
Comment by SayaYuki
2011-06-22 23:26:16
Very easy mission. Completed in a Maelstrom tanked with invul field II x2 and x-large emergency shield overload I, and shields never got below 80%.
Comment by ChenParn
2011-11-12 14:05:54
Completed in a Blaster ROKH, it was over before my guns got warm.
Comment by MolinatorAgnon
2012-04-10 18:23:08
got through this in around 20 minutes in Legion, even without all subsystems to 5.

used two heat sinks, 1 EM, 1 therm hardener and two MAR II's. only had to pulse a single MAR a few times throughout the whole mission.
Comment by Miquell2010
2012-08-08 11:02:39
Some about 20 min with Tengu: 6 launchers, Explosive Defl. Ampli. 2, Kinect Def. Ampli 2, Explasive Defl. Field2, Large Shield Extender, Kinect Defl. Ampl and 10MN Afterburner, 3 x Ballistic Control Sys 2, Reactor Control Unit 2.
Damage taken 10% shield, Afterburner did`t let opponents fly too close. Loot 2,147,000 ISK
Comment by NevilleSmit
2012-09-09 13:24:53
Completed in Ishtar - just kill the webbing frigates first and you'll have no problem.

DCU II, Armor Rep II, EANM II, 400mm plate, Armor Explosive Hardener, Sensor Booster, Drone Nav Computer II, 2 x Cap Recharger II, 10mn AB II, 3 x 200mm Railgun II, Drone Link Augmentor II, 10 x Ogre II, 5 x Hobgoblin II, 2 CCC rigs - cap stable and works great if you keep moving at 500+ m/sec
Comment by MalMasters
2013-02-22 03:18:26
My salvage from this mission has been between 1.76mill to 2.86mill
Comment by AbeDoo
2013-04-09 11:46:24
Dominix with dual LAR IIs. Your drones do not get targeted (post Retribution). Easy mission - just keep range and fire away
Comment by LunarShaddow
2014-03-06 03:21:39
The mission is marked completed when I destroyed 2 of the 3 Drone Bunkers. Don't know which one is the trigger but clearly I don't need to destroy them all.
Comment by XeCara
2015-07-02 12:56:51
drone aggro is an issue post mosaic
Comment by hal9k
2018-04-12 02:25:16
was wary of this mission flying gnosis alpha clone,turned out to be a walk in park. Never got webbed/scrammed once drones took very little damage sheilds went down to 80% nice scenery however ship got hung up on acc gate to pocket 2
Loot 0
Salvage 4.1m
Bounties 2.9m
Comment by CalCanon
2019-03-16 08:51:50
Killing the 2nd group and the associated bunker in pocket 2 no longer completes the mission. It looks like you need to kill 2nd and 3rd group plus bunkers at least but I need to verify.
Comment by Taggo
2020-07-17 15:43:32
Just ran this on July 17, 2020, and all mining has been removed from the mission.
Valid XHTML 1.0 Transitional :: Valid CSS :: Powered by WikkaWiki