Silence The Informant, Level 4


Last edited by Demal:
Updated loot total and bounty total.
Mon, 28 Nov 2022 08:55 UTC

Faction: Drones, Mercenaries
Mission type: Encounter
Space type: Deadspace with Acceleration Gate
Damage dealt: Thermal (45%)/ Kinetic (28%)
Web/ Scramble: Mercenary Wingman, Spider Drone
Recommended damage dealing: Thermal/ Kinetic (Mercs), Em (Drones)
Recommended ships: Raven, Golem, Drake, Dominix, Sleipnir
Video: Tengu, Raven, Raven Navy Issue


The mission is flagged complete once you've killed the named Ex-Elite Secret Agent.


No Hostiles at Initial Gate.


1st Pocket (Drones)

Auto-aggro from the Sentry Towers, attacking them will aggro the entire pocket (use to draw 3rd group closer).
Recommended order of elimination: 2nd, 4th, 3rd and 1st group.
Aggressive drones may attack the 1st group and cause unwanted aggro. Watch out for drone aggro.

1st Group (50- 90km)

2x Tower Sentry Drone II

2nd Group (50km)

2x Battleship (Elite Drone Parasite)

3rd Group (75- 90km)

6x Cruiser/ Battlecruiser (Disintegrator Alvum/ Enforcer/ Striker Alvatis)

4th Group (50- 60km)

3x Battleship (Elite Drone Parasite)

Acceleration gate to next pocket is at 4km.
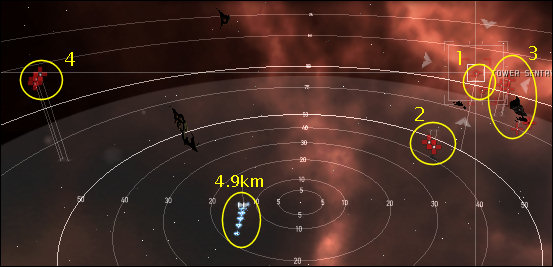

Pocket 1 initial groups at warp-in


2nd Pocket (Mercenaries)

Auto aggro from the 1st group, eliminated safely without drawing aggro from the entire pocket.
The 2nd and 3rd groups will show up several seconds later.
Recommended order of elimination: 1st, 2nd, 3rd and 4th group.

1st Group (50- 60km)

2x Spider Drone I Web
3x Elite Frigate (Mercenary Wingman) Web/ Scramble
5x Cruiser (Mercenary Commander)

2nd Group (8- 10km, Acceleration Gate)

4x Elite Frigate (Mercenary Wingman) Web/ Scramble
4x Cruiser (Mercenary Commander)
1x Battleship (Mercenary Overlord)

3rd Group (55- 60km, Asteroid Mining Post)

2x Spider Drone I Web
2x Battleship (Mercenary Overlord, Jericho Tezmar/ Roranok Nesmyrthas)

4th Group (75- 80km, Ruined Stargate)

6x Cruiser (Mercenary Commander)
1x Battleship (Mercenary Overlord, Yarl Uzbeki)

Acceleration gate to next pocket is at 6km.
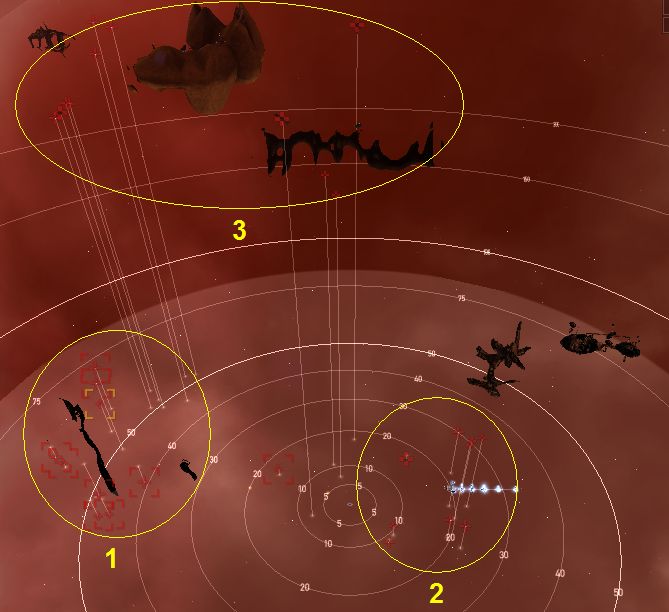

Pocket 2 Initial Group At Warp-In.


3rd Pocket (Ex-Elite Secret Agent)

Auto aggro from the Sentries. Far Sentries (100km and more) will not aggro until you approach closer than 99km.
Attacking any of the Sentries will aggro the lone cruiser.

1st Group (60- 100km)

3x Tower Sentry Drone II
5x Tower Sentry Drone III

2nd Group (75km)

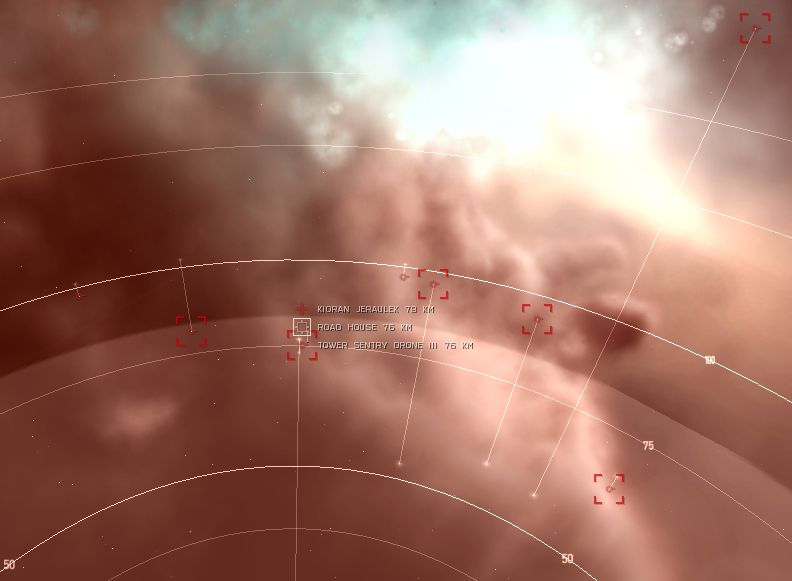
1x Cruiser (Ex-Elite Secret Agent - Kioran Jeraulek)

Structure
Sentries may drop ammo.
Roadhouse drops random T1 loot.


Pocket 3 Initial Group At Warp-In.


Blitz
You have to kill everything, but the Sentry Towers in Pocket 1 and 2 to get to Pocket 3.
Snipe and kill the lone cruiser. Warp out.

Mining
2nd Pocket has 4 Veldspar asteroids of 1,200 units each (56- 90km).

Loot and Bounty
The Elite Drone Parasite drops 5 Elite Drone AI.
Loot + Salvage: ~15.2 mil.
Bounty: 6.4 mil.


Ship Detail


Pocket 1

QtyNameOrbit
(km)
Velocity
Max (m/s)
Shield
(hp)
Armor
(hp)
Shield Resistance (%)Armor Resistance (%)DPS (hp/s)
EMExpKinThEMExpKinTh
EMExpKinTh
5xElite Drone Parasite402503,0005,500
-60402080506065--80112
6xDisintegrator Alvum34501,500600
2656463626564636-228-
2xTower Sentry Drone II--5001,600
-60402060102535-21310
11 Ships Total Average/ Total25,00034,300
1258432767474847-136474580

Pocket 2

QtyNameOrbit
(km)
Velocity
Max (m/s)
Shield
(hp)
Armor
(hp)
Shield Resistance (%)Armor Resistance (%)DPS (hp/s)
EMExpKinThEMExpKinTh
EMExpKinTh
4xSpider Drone7.53,000450250
1362323260102525----
7xMercenary Wingman8.5900325325
15504530701025251084-
15xMercenary Commander154001,2001,800
-6040205010253522-728
4xMercenary Overlord3.54003,9753,500
-60402060-2535--2496
30 Ships Total Average/ Total25,80044,300
5584024579253140056229804

Pocket 3

QtyNameOrbit
(km)
Velocity
Max (m/s)
Shield
(HP)
Armor
(HP)
Shield Resistance (%)
Armor Resistance (%)
DPS (hp/s)
EMExpKinThEMExpKinTh
EMExpKinTh
3xTower Sentry Drone II--5001,600
-60402060102535-21310
5xTower Sentry Drone III--1,0003,200
-60402060102535-32216
1xEx-Elite Service Agent54002,2502,000
106050306025603012070--
1 Ship Total Average/ Total8,75022,800
16041216012293412091149110


CategoryMissions
CategoryLevel4
Comments
Comment by UlfskeinGangr
2008-06-18 03:13:51
A suggested tactic for Pocket 2:

The Mercenary Wingmen are all using webs and have high shield regen, while the Mercenary commanders have a slightly higher DPS. I was able to complete this pocket in a Ferox by concentrating fire first on the commanders to reduce the total incoming damage to a manageable level and then following through in the wingmen.

Also I have noticed that the wingmen are able to switch their fire to your drones even if you are already aggroed, so be careful.
Comment by IcerCRO
2008-07-13 10:17:05
AD Pocket 1 salvage:

Despite from the Elite drone AIs in the wreck "cargo" section the elite drone wreck yields only metal scraps as salvage.
Since they disappear really fast (<15mins IMO), get as close as possible before opening fire and loot as soon as you've made the kill.
Comment by SturmWolke
2008-07-25 13:58:29
Please refrain from editing the main article unless you can provide details of the exact ships types and have done this mission more than several times to see the ship patterns. Pocket 1 - Group 3 ship mix randomly varies.
Comment by PeterTjordenskiold
2008-08-02 16:02:04
The problem is, that Mercenaries needing kinetic som damage type. It works with drones too. So I recommend the main damage types thermal and kinetic. This should be approved by someone.
Comment by KireHunted
2008-08-23 10:06:20
Mercs need Thermal as listed. Drones need EM as listed. If you only want 1 damage type go EM as long as you've got decent skills they drop quickly. If you are in a ship that uses drones use EM/Thermal drones should be fairly easy. I used a raven and Paradise cruise each time and it goes quickly enough the tank holds.
Comment by KeLum
2008-09-08 18:35:22
I just ran this mission today, the Elite Drone Parasite wrecks lasted for well over a hour. As well, I was successful in salvaging them for normal salvage components, and not metal scraps.
Comment by SkyKeeper
2008-09-12 06:24:54
Pocket 1
Elite Drone Parasites have low tracking. orbiting at 350ms at 35km prevents more than 60% of damage. They also have 2 defender lauchers.
Pocket 2
battleships do heavy damage at close range, but die pretty fast. Should be killed at appropriate time.

Mission is doable with ~200hp/s effictive tank with appropriate resists. Had to warpout after clearing pocket 1 to switch resists.
Comment by VaLTrantor
2008-10-22 05:05:01
The Drone-Battleships can be killed much faster with kin-damage than with EM - at least thats what I found out with my Drake (with kin-bonus). Shields take a little bit more EM-damage, but on Armor I did just 40+ damage with my Thunderbolt heavies (EM) compared to 100+ with the Scourges (kin).
Comment by RilWar
2008-10-26 00:29:38
I think the reason for confusion about 'dissapearing Elite Wrecks' thing is they come up as Rogue Small on the Overhead Display, while they come from BS sized ships.
Comment by DamithdEstelas
2008-11-20 06:18:06
The gate to pocket 2 is now just 5km away from the warp-in point in pocket 1, rather than 53km, as it was previously. Speeds things up a lot if you're in a slow battleship.
Comment by ChepeNolon
2008-11-20 12:13:26
Uploaded the modified screenshot from pocket 1 from DamithdEstelas.
Comment by BuilderAlphaOne
2008-12-07 21:12:01
Pocket 2/Group 2 -- there is a limit beyond which the Mercs will not travel. They turn around and go back to start locations when they reach it. Even the OverLord proved to be faster than my Nighthawk without an AB.
Comment by BuilderAlphaOne
2008-12-07 21:53:22
Pocket 2 has four widely separated, small Omber 'roids. (1200 units each). Imo, not worth the effort to mine these.
Comment by BigBadaboom
2009-01-04 19:40:17
On the Elite Drone Parasites, I did more than twice as much damage with Scourge (Kinetic) missiles than I did with Widowmakers (Thermal), which were slightly better than Thunderbolts (EM) - Considering I have trained Battlecruisers V (+25% Kinetic Damage), it was still over twice the damage. (I did it in a semi-passive Drake, no sweat)
Comment by MolinaarFinn
2009-01-08 14:53:31
NOT a blitz if you HAVE to kill ALL 30+ ships before the second gate is accessible.
Comment by QianzingYanshu
2009-03-27 03:54:32
I just dropped out of warp right in the middle of the group with the Sentries. That was around 79Km away from the gate. Last time, I nearly stumpled over the gate when warp was finished (like noted by DamithdEstelas).

Has anyone else encountered this?
Comment by DrugsDen
2009-03-27 05:14:42
Im doing this mission atm and the 3x Battleships (Elite Drone Parasite)
(Pocket 1 group 4 )they are just flying away from me seems you now need to fit an Afterburner. anyone else had this happen?
Comment by OneShot
2009-03-28 19:27:48
I can confirm that the first warp you initiate to the mission will bring you to the sentry blob and the second will bring you to the gate. It's really annoying to be honest.
Comment by QianzingYanshu
2009-04-02 04:40:04
I can't confirm the info from DrugsDen. My group of 3BS flys at max 55m/s and I'm able to close in on them as I fly to the gate.
Comment by SethDeVeldrin
2009-04-13 11:21:49
Quite an easy mission, finished with a Drake (res: 81% therm, 68% kin, 10% EM), used kin heavy missiles.
Comment by QianzingYanshu
2009-04-22 10:14:19
This time I ran this mission, I dropped out of warp close to the gate and about 70-80km away from the sentry-blob.
Comment by RagnaValdr
2009-04-28 02:13:58
Easy mission in my Fleet Tempest: 2x t2 Therm and 2x T2 Kin hardeners
Comment by GeorgeSheng
2009-05-03 14:32:24
At the pocket 2 are 4 groups - the Group 3 has 2 groups inside of it:
Group 3.1:
2x Frigates (Spider Drone I) Web
1x Battleship (Mercenary Overlord - Jericho Tezmar)
1x Battleship (Mercenary Overlord - Roranok Nesmyrthas)

Group 3.2:
6x Cruisers (Mercenary Commander)
1x Battleship (Mercenary Overlord - Yarl Uzbeki)

Doing mission ATM (DOminix, active armor tanking) - found it by atacking Spider Drone, had Agro from group 3.1 only. After destroing it, atacket Yari Uzbeki and had agro from group 3.2
Comment by TheMoron
2009-05-15 02:23:41
I can confirm GeorgeSheng's comment about 4 groups in pocket 2. I had the same experience by attacking the cruisers (only aggroed Yarl Uzbeki).
Comment by ShadowFox07
2009-05-29 23:29:10
I found that attacking the frigates first in group 3 of pocket 2 only aggro'ed the 2 frigs and 2 bs's
Comment by StrykeZor
2009-07-07 10:12:25
I just ran this mission, attacking group 1, 2, 3, and 4 in that order did not aggro other groups. Came into mission expecting that attacking either group 2, 3 or 4 would aggro the other groups, but it did not.
Comment by MapinTan
2009-07-13 03:03:21
1) Dont forget to change your hardeners accordingly after clearing pocket 1 and entering pocket 2
2) in pocket two wait until the autoaggro group has started shooting you and then only shoot them back to clear this group - I accidentally shot a frig from other group and pulled the aggro of two groups.
As long as you manage the group aggros separately it should not be a problem even for a low SP character (like me) - but I had to learn it the hard way.
Comment by MaciejSimm
2009-07-17 20:46:58
I highly recommend nemesis as a good offensive ship (requires a second ship, fast decoy, or drone boat with reppers, etc. I used the ishkur. ).

With 3x torp launchers you can volley ~1800ish DPS / 9 sec with medium-ish torp skills. With torps, this damage comes in all four flavors.
Comment by KunniS
2009-08-07 13:10:53
For the Pocket 2 (Mercenaries) the guide says: "Recommended order for elimination : Group 1, Group 2, Group 3 and finally Group 4."

I would warn that attacking Group 1 before auto-aggro spider drones have arrived pulls all the groups in and gets you killed because of warp scrams.

So wait for the spider drones 1st, if there are any. They move like 1+ km/s.
Comment by MrT
2009-08-22 16:42:50
Pocket 1: Follow the guide. Done in a T2 fitted Rokh. (Fairly Easy)
Pocket 2: Monkey read monkey do. Done in a T2 fitted Rokh. (Normal/be careful though) Alot of web.
Pocket 3: Very very easy

Bounty:
Mission: 2,2 mill
Loot and salvage: 10,9 mill
Total: 13,1 mill
Comment by StefanFinseth
2009-09-26 17:21:58
It appears that the sansha battle station isn't getting hit by drones when ordered to attack it for some reason, tried with hobgoblins, hammerheads and ogres...
Comment by CrucO
2009-09-30 00:15:55
drones attacking stations usually means that the firepoint is far outside the drone's range even when they're orbitting as close as possible. try sentries when attacking a station.
Comment by LiviaCatarella
2009-10-28 18:04:57
Astonishingly enough, I had by far the best damage results using Kinetic T2 Missiles on the Elite Drone Parasites in Pocket 1. I was flying a Caldari Navy Raven, so no ship bonus on kinetic damage applied. Perhaps someone else could try and confirm?
Comment by MrTetsuo
2009-11-11 05:37:12
Done in a Megathron, 2x CCC, 1x Auxiliary Nano Pump, AB II, 2x Cap Rechargers, 1x Cap Power Relay, 1x LAR II, 1x Armor Kinetic/Thermic Hardener II, 1x DC II, 2x Magnetic Field Stabilizer II, 7x 425mm Railguns, 1x Tracking Computer II (a webfier may be more useful for pocket 2, see below), Faction ammo and Amarr Drones (Infiltrator and Acolyte).

The first 2 Battleships from pocket 1 can do some damage, everything else from this packet is fine.

Initial group of pocket 2 is the hardest part of this mission. You will be webbed in a few seconds by the drones, then by the Frigates. Wait until you are attacked, so you don't aggro another group. Make sure you are attacking the correct ships (there are about 30), engage the Cruisers with your guns, and have your light drones pick the webfier drones, then the Frigates. Next time I'll try fitting a webfier to help my drones destroy the attacking drones and frigates.

Rest of pocket 2 was rather easy. Pocket 3 was also of no concern, engaged all towers and had my medium drones pick up the Cruiser once it was in range.

Took around 45m to complete the mission, 25m to salvage.

2.5M isk of rewards, 3M isk of bouties, 2200m3 of loot (including Alloys/Compounds from drones, very little and up to Zydrine), 5x Elite Drone AI, Salvage includes Circuit Boards/Melted Capacitors/Metal Scraps. Not an impressive isk/h mission.
Comment by CrucO
2009-11-20 16:29:23
at one point in this mission I had 5 webbers on me. Max speed was 1.8 meters a second. Aside from an (apparent) server/client desynch that held up my warp-out, i had no problem finishing this mission.

Passive T2 shield tanked rokh with 425mm Scout cannons.

The three Elite Drone Parasites were able to keep me at 40-53 kilometers (I was flying 108 m/s at that time)
Comment by ClariusFolkar
2010-01-02 20:56:17
The Road House in the final room contains approximately 3 mil worth of modules. Don't forget to blow it up.
Comment by JeroNimax
2010-02-04 03:49:37
dont get to close to the drones with a salvager og small supportship. They can change target and suddently attack another target. just lost a fully T2 fitted salvage-destroyer on the last elite drone in pocket one. Don't know what triggered this, I was 30 km away and suddently *poof*
2010-03-17 21:04:24
COnfirm DrugsDen's comments from ages ago about Elite Drone Parasites running away. I'm currently chasing the group of three that went to about 90km away from me for no good reason... if i weren't in a Drone boat this wouldn't be a problem, but alas...
Comment by RentBoyUk
2010-04-13 14:58:05
Completed in Caldari Navy Raven. First pocket was touch and go but pulled through.

High slots:
7 x XT-9000 Cruise Missile Launchers loaded with Wrath Cruise Missiles
1 x Drone Link Aug

Mids:
2 x Invulnerability Field II
1 x Ballistic Defelection Field II
1 x Heat Dissipation Field II
1 x Caldari Navy X-Large Shield Booster
1 x Caldari Navy Shield Boost Amplifier

Lows:
2 x Ballistic Control System II
3 x Capacitor Flux Coil II

Rigs:
3 x Large Capacitor Control Circuit
Comment by RentBoyUk
2010-04-17 05:31:15
Completed again in CNR. Just wanted to add that the second pocket hit you very hard even with good EM resists. I had 2x Photon Scattering Field II and 1 x Invuln II and I could hardly hang about any longer. I did make the mistake of using missiles against the battleships and light drones against the small frigates. What I should have done was use missiles and medium drones to take down the cruiser sized targets ASAP - since they seem to do far more damage than the others.
Comment by DragonWind
2010-06-05 16:27:38
Room one, drone sentries will switch agro to drones. Suggest taking them out first if you are using drones.
Comment by CeqLysander
2010-07-29 16:36:19
I've run this mission twice recently and there has been no pleasure hub in the third pocket. Has this been removed or is it a random spawn?
Comment by Ice3yes
2010-08-17 05:22:42
I believe the Pleasure hub may now be a Roadhouse, It explodes instantly, but dropped nothing but junk for me.
Comment by EronaileDamod
2010-08-28 14:36:24
Pocket 1:
From what is written on http://games.chruker.dk/eve_online/ , I'd suggest Explosive damage against the BS because their armor has lots of hitpoints and lowest resistance there is Explosive. Shields have higher Exp resistance but low hitpoints so... obvious choice.
The cruiser/bcruiser class ones seem to be vulnerable to (surprise!) EM damage. Pure EM works best.
Since you'll normally do the tower drones last they don't really matter. To kill them fast use Thermal damage.

Let's hope you can change damage type quickly like with missile boats :)

Update: This mission is quite easy even with a mostly T1-fitted normal Raven. Those Drone BS die quickly, incoming damage from sentry drones isn't too bad and the mercenary groups are easy pickings as well if you do not let them come close, in which case their turret fire will do heavy damage, try to avoid that ;)
Comment by EronaileDamod
2010-09-13 09:00:22
Update: sentry drones in Room 1 can be killed by your drones without aggroing the pocket.
Comment by ShadowUser
2010-12-07 16:35:06
A single LAR and 2 Therm, 1 Kin, and one Shadow Serp EAMN Domi can tank both rooms long enough to destroy most the incoming dmg, just don't grab all room agro, one group at a time :)
Comment by DarcelBlack
2011-01-08 08:02:54
I found the Elite Drone Parasites to hit VERY hard. I have 89%/81% resists for Therm/Kin respectively. Luckily my drones managed to destroy them all before needing to warp but I was certainly getting nervous. This is with a fully tech 2 tank.
Comment by FluffyBunnySlippers
2011-01-20 13:51:46
The Elite drone parasites are weakest to expolsive on armor and EM on shield.
Comment by JimmyDoe
2011-02-04 14:57:33
Jeese. This mission is one of the easiest out there. I've been doing it for atleast 5 years.

CNR 1 Invul II, 1 Photon, 1 Kinetic, 1 Thermal, XL booster, Sensor booster.
7x CN Cataclysm cruise missles

Stage 1: aggro the 2 Elite Drone Parasites between you and the cruisers. Kill them. Then aggro the Cruiser class drones. Launch your drones and let them handle the cruisers while you kill the remaining 3 Elite Drone Parasite BS's.

Stage 2: When you land, the group of cruisers/frigs behind you will aggro, Kill them when they spawn starting with the cruisers. DO NOT WORRY ABOUT THE FRIGS. Once the commanders are dead, kill the mercenary Overlord and commanders that are infront of you. Once you have aggrod this group, it is safe to launch drones and let them handle the frigs.

Once the commanders and overlord are done, kill the 2 named bs's directly above you.

Once they are dead, kill the remaining group of commanders and named BS.

Stage 3: when you land, just start popping sentries while you want on the informant to approach you. Very easy mission over all.
Comment by HillAnt
2011-02-12 09:17:32
I strongly disrecommend this mission to low sp amarr laser users, the mobs and sentries are highly resistant, and additionally the payout is not that great.
Comment by ProgHouseDJ
2011-03-16 23:49:15
For Caldari pilots- go with straight Thermal damage on this one. Best all around.
Comment by MagiX
2011-03-17 20:04:47
Non-blitz/Full clear according to current Jita prices

LP: 5540 x 1000 = 5.54M
Loot: 5.20M
Bounty: 3.19M
Reward: 3.19M
Salvage: 3.01M
---
Sum (no salvage): 11.92M
Sum (excl. LP): 14.59M
Sum: 20.13M

Mission (undock - reward): 37 min
Salvage (undock - dock): 22.5 min
---
Sum: 59.5 min (mission 3 jumps away)

Ship: Raven (T2 some faction)
Pilot: 17.35M skill points

ISK/h: 20.30M/h
ISK/h (no salvage): 19.33M/h
ISK/h (blitz): ?
Comment by FulmarMusic
2011-03-24 18:15:59
Tengu will have problems if u running th standard 1 small sb fit in the 2nd rm, drake is prefurable, or something else ith a large buffer + shield regen
Comment by TheHuffarunier
2011-05-07 16:44:48
Something is off with my math. I had a tank of 401 dps against mercenaries as per EveHQ. Based on the fitting screen resistance levels and the data table for pocket 2 I should have been easily able to tank the entire pocket. I had to warp out twice. FYI
Comment by StoicFaux
2011-06-08 15:45:45
If you're a missile user, don't use EM ammo on the Elite Drone Parasites.
Elite Drone Parasite EHP:
EM Expl Kin Therm
37,000 25,000 25,250 25,965

Disintegrator Alvum EHP:
EM Expl Kin Therm
3,388 5,323 4,439 3,832

Striker Alvatis EHP:
EM Expl Kin Therm
5,786 9,000 7,500 6,500

Enforcer Alvatis EHP:
EM Expl Kin Therm
4,629 7,200 6,000 5,200

If you're in a kinetic damage bonus ship (such as a Tengu) I recommend Kinetic missiles against the drones. I nine salvo the Elite Drone Parasites in an HML Tengu.
Comment by WheatGrass
2011-06-09 01:04:18
Pocket 2 has veldspar asteroids rather than omber.
Comment by RobArkhan
2011-06-26 00:20:22
Pocket one seemed to aggro my drones even after I shot at them, so I think they changed aggro rules on them with Incarna
Comment by ZikatArzi
2011-08-20 23:07:12
HillAnt was right. Very hard for non-highSP Amarr pilots. Decline and get another mission.
Comment by TyupiKhardula
2011-11-24 09:05:02
It's not true about the Amarr thing. I'm a new pilot, playing for 45 days, 2.2M SP. Done with Apocalypse 2xT2 Therm, 2xT2 Kinetic Hardeners, Large Armor Rep II, T1 drones, 4 cap recharger II, 3 ccc, needed 2xBeta Control unit for PG. BS only lvl 2, Large Energy turret lvl 2 too. I have the apo only 4 days. The mission was 50 minutes without salva, but armor never went below 75%.
Comment by ReaveToralen
2012-01-22 16:21:47
Drake takes it easy when managing aggro properly.
BTW, Kioran Jeraulek in last pocket is webbing, nasty issue as Sentries III have quite a DPS and hits always.
Comment by PsychoticPsychosis
2012-03-27 11:47:24
LOOT THIS MISSION

2x Arbalest Heavy
2x XR-3200 Heavy
1x Medium Regolith..

LOADS MORE :D
Comment by BuilderAlphaOne
2012-05-07 21:35:24
After Escalation [April 2012] the Rogue Drones now have bointies totaling 1.44m but no refinable loot.
Comment by LolesChech
2012-08-17 13:08:58
To clarify, the second and third pockets do have loot because there aren't any drones. Just got over 20m of loot & salvage from them.
Comment by ReaverGlitterstim
2012-09-02 05:08:01
Completed in megathron with rails--I shot each group in the order listed on this page, and never got aggro from any other group. I also didn't move while I was fighting.

Hobgoblins took out all of the frigates pretty easily, and everything else died pretty quickly even to long range ammo. The incoming dps was pretty high in the second pocket, but a buffer fit was more than enough to finish everything off. I think megathron should be added to the suggested ships list.
Comment by Titan1978
2013-05-25 15:29:45
In the First Pocket - The Group 1 Never Auto Aggro'd me. As of 5/25/2013. Painfully easy mission. Done in CNR pre-odessey(maybe thats why
Comment by JackUnderhill
2013-06-30 22:08:51
When I do this in a Sleipnir, I've found it worthwhile to switch to 425s in the second level while using 720s in one and three; I find I can down all but a couple of the gnats quickly with guns and get back up to speed with only some assistance from my drones.
Comment by EveMir
2013-09-09 09:19:05
Bounty: 6,2 mil
Salvage/loot: 9,9 mil
Comment by HaruChan
2013-12-09 13:45:39
Did this 2 times, no auto-aggro in pocket 2!
Comment by MorbertFlorbin
2014-03-11 03:19:41
AWWW come on - Drones = EM Mercs = Thermal get your damage to deal right!
Comment by BraylenStarseeker
2014-10-05 01:01:12
In a Raven with Cruise Launchers, and using the damage tables above I switched to two sets of damage types; one set of missile launchers to take down the shield and the second the armor. Once the shield was down, I switched targets and then picked off the armor with my second missile launcher set. That made a huge difference in the speed of taking these down instead of the generic 'use thermal'. For example in the last pocket I used EM for shields and then Explosive as it has the lowest resist for armors.

It's more work and can be unnerving at first, but once you get the hang of it, speeds things up a bit.
Comment by Saudade1179
2015-01-12 07:22:33
I felt like trying, so I took the time to blow up the structures.

I can confirm that none of them - some (Infested Station, Ruined Stargate etc.) had a fairly high amount
of hit points - dropped anything, the only exception being the Roadhouse, which dropped 5 Metal Scraps.
Comment by AribethThiesant
2015-03-02 22:05:40
Dominix, T1 Light+Heavy Drones, 2 reps, 3x350mm guns..
Pocket 1. Followed guide. Easy
Pocket 2. Followed guide. Easy. *I got no auto agro from any group*
Pocket 3. Followed guide. Easy
Comment by hal9k
2018-10-24 14:03:30
alpha clone flying raven pocket 1 took out drone parasites BS,s 1st then 2 towers then cruisers np.pocket 2 took out groups in order 1234 drones took no damage webbed a few times but no scrambles pretty easy really
pocket 3 think ima leave that for now and farm mission for the AI chips
Valid XHTML 1.0 Transitional :: Valid CSS :: Powered by WikkaWiki